Preparation for cold weather dinghy racing

The risk for hypothermia is greatest when air and water temperatures are less than 48 degrees, combined. We should not allow any sailor on the water if they are not appropriately dressed for the conditions.

Even when hypothermia risk is low it is important to preserve core temperature. Since some of our sailors are new to the sport it is important that they dress appropriately for the conditions. First and foremost, the baselayer must NOT be cotton. Cotton tends to promote heat transfer in cold weather causing a loss of core body heat. Baselayers should be synthetic materials.

A good rule of thumb is that on the water it will feel 10 degrees colder than on land. In cold weather having a waterproof layer and an insulating layer are vital.

There are a number of options that sailors can use. For example :-

Drysuits – a drysuit is a waterproof one-piece suit with neoprene closures at the neck and wrists and usually attached booties. Essentially it’s a waterproof footie pajama. The sailor puts this on over an insulating layer (drysuits themselves are not insulated). The advantages of a drysuit are that they can be worn over regular coldweather clothing to the tolerances of the sailor. The disadvantages are that they are expensive. These are the primary choice for most dinghy sailors and the better brands tend to last for many years with proper care.
Wetsuits – alternately alot of sailors use wetsuits. These, for the most part do not keep the wearer dry (there is one company that produces a “dry” wetsuit.Instead the wetsuit takes in water and traps it in the material which then serves as an insulating layer keeping the wearer warm. Wetsuits come in many styles including full coverage and “shorty” partial coverage, and sleeveless. The disadvantage is that it will get wet and initially will be cold until the wearer’s body heat warms the trapped water. The major advantage is that wetsuits can be relatively inexpensive.

Spray tops – a spray top is a waterproof pullover jacket with neoprene seals at the wrists, neck and waist. This is one of the most common pieces of clothing you will see. Like the drysuit it can be worn over other layers. Since this is a jacket, it will not protect the wearer from the waist down. If the wearer is looking for full coverage then a bib or waterproof pant is necessary.

Salopettes, Bibs and waterproof pants – waterproof pants are just that and provide coverage for the lower body up to the waist. Bibs and Salopettes on the other hand provide coverage up to the chest and in the case of the latter the full torso. The do not cover arms. Like dry suits they are intended to be worn over other clothing. Worn under a spray top this provides full coverage and minimizes the chance that spray will get the sailor wet. However, most such pants/bibs/salopettes do not have neoprene cuffs at the pant leg hem and so if immersed the sailor will get wet. These are more ideal for boats that are not likely to capsize. Also they can be loose and cause less mobility and more ability for lines to get caught or snagged increasing the possibility of a capsize on a dinghy.

Unlike drysuits and even wetsuits, if a sailor capsizes wearing a bib/spray top (smock)/waterproof pant combination, it is possible that they will get wet and cold as water might seep in through the hems. For this reason, drysuits are usually the first choice for dinghy sailors, with wetsuits as second choice. Wetsuit companies are now experimenting with a new hydrophobic version of wetsuits that do keep sailors dry and insulated. These suits run at the higher end for wetsuits (skiff suits) but are still usually less expensive than drysuits.

The most common combination and the one that is usually least expensive is a wetsuit worn under a waterproof layer of Spray top and properly fitted waterproof pants. This in addition to wearing a life vest, which is an added layer of insulation as well as flotation, is enought ot keep a sailor safe after a capsize.

Gloves – Hands are very difficult to keep dry but can be kept warm using neoprene gloves. Skiing outfitters and winter camping vendors have some great options that are inexpensive, waterproof and warm. In the last few years, heavy duty latex gloves, similar to those used for dishwashing by hand (try to get some of the kids to understand that concept) have become very popular. They will keep the hands dry and provide plenty of grip on lines. Some stores suggest adding a liner for added warmth although the ones used by sailors are thick and therefore provide some insulation.
Shoes – Feet, will be the most likely to get cold quickly. Here again there are good, inexpensive options. It is usual to wear dinghy boots. In most cases these are not waterproof. However, a pair of waterproof socks over a pair of smart wool socks is usually plenty to keep a sailor dry and warm in dinghy boots or shoes while dinghy sailing.
The head, Spray tops do not come with hoods. Hoods also have a tendency to limit field of vision. Nevertheless there are waterproof neoprene hoods on the market for those who want to keep their heads warm without diminishing field of vision.

These are just a few of the more common options for cold weather sailing. All are subject to the comfort and peccadilloes of the sailor. We all have our preferences and sailors are notoriously finicky (you know you are).

Posted in General | Leave a comment

The world according to OWEN

I think you all know my feelings in respect of SAS pathways, high performance training squads, selected classes etc. I support sailing Dabchicks because it gives sailors the opportunity to learn how to sail a proper sailboat. The class is competitive with a fun element and excellent comaraderie. Many take part in regattas knowing they are not the likely to make the top 10,but enjoy trying to achieve that. Dabbie sailors want to sail without the pressure from over enthusiastic Coaches hell bent on Olympic campaigns and not to mention over zealous parents with failed ambitions, they now wish to force their kids to fulfil for them.

I came across the following on the Sailing Anarchy Blog which goes to prove that the aforementioned is not only endemic to us.

I have yet to see a coach poaching people from fleets/clubs around here. Mostly what I see is coaches involved in youth teams trying to push kids into particular boats (around here the laser has long been a favourite to put absolutely everyone who ever showed a bit of promise in). Then a year or two later if the kid hasn’t made the provincial or national team they get virtually dumped and the concentration is on the next set of kids.

I find it so frustrating at times to see this practice as I know a bunch of people that were sailing at the same time as I was, they were involved in such programs and by the time they graduated high school (even if they had made the teams) they quit because they were (in their own words) “burned out”. A number of them took up windsurfing or kiting, but plenty have left sailing. Meanwhile I was in a much more relaxed program and a lot of the people from that program are still in some way connected to sailing though most are not racing.

I want to put the blame on the coaches for pushing the kids so hard that they burned out before they had a chance to really enjoy it, but in the case of kids the parents are just as much to blame. The parent wants their kid to be the best and go through hassle and expense, in turn the kids don’t want to disappoint their parents… But that’s the way the world is these days, look at any other sport and you see the same thing.

There is always space for the top guys,but we need to concentrate on getting numbers on boats and to do this the sailors must enjoy themselves.Yes, get them onto Dabbies, who knows they may still be floating around, like me at 58.

Owen

Posted in General | Leave a comment

Wade Ashton in action– pics Barbara Sher

Posted in General | Leave a comment

How to sail a boat – some basic knowledge- wiki how

Know the different parts of a sailboat. It is important to know the different parts both for safety reasons and to be able to sail your boat as efficiently as possible. If you don’t know what to do when someone suddenly yells, “raise the jib” or “watch the boom!” you may be in trouble.[1]
•Block: This is the nautical term for a pulley.
•Boom: The horizontal support for the foot of the mainsail which extends aft of the mast. This is what you want to watch out for when changing directions in a sailboat. It can give you quite a wallop on the head if it hits you.
•Bow: This is what the front of the boat is called.
•Centerboard: This is a (usually fibreglass) plate that pivots from the bottom of the keel in some boats and is used to balance the boat when under sail.
•Cleat: Cleats are what lines (or ropes) get fastened to when they need to be kept tight.
•Halyard: Lines that raise or lower the sails. (Along with the sheets, aka running rigging.)
•Hull: The hull is the body of the boat and consists of everything below the deck.
•Jib: This is the sail at the bow of the boat. The jib helps propel the boat forward.
•Genoa: A foresail which is larger in size than a jib.
•Keel: The keel is what prevents a boat from sliding sideways (“making leeway”) in whatever way the wind is blowing and stabilizes the boat.
•Line: Lines are ropes. They are everywhere on boats. There is only one “rope” on a sailboat, the bolt rope which runs along the foot of the mainsail.
•Mainsail: As the name implies, this is the main sail of the boat. It is the sail attached to the back of the mast.
•Mast: The mast is a large, vertical pole that holds the sails up. Some boats have more than one mast.
•Painter: This is a line positioned at the front of small boats. It is used to tie the boat to a dock or another boat.
•Rudder: The rudder is how the boat is steered. It is moveable so that when you turn the wheel or tiller, the rudder directs the boat in the direction you would like the boat to go.
•Sheets: The lines that control the sails. (aka running rigging.)
•Spinnaker: The usually brightly colored sail used when sailing downwind or across the wind.
•Stays and Shrouds: There are wires that make sure the mast stays upright, even in very heavy winds. (aka standing rigging.)
•Stern: This is the term for the back of the boat.
•Tiller: The tiller is a stick attached to the rudder and is used to control the rudder.
•Transom: This is what we would call the butt of the boat. It is the back part of the boat that is perpendicular to its centerline.
•Wheel: The wheel works the rudder, steering the boat.
•Winch: Winches help bring in the lines. When lines are wrapped around a winch, a sailor can turn the winch with a handle, which will make it easier to bring in the lines.

Know about the different kinds of sailboats. In general, if you are a beginning sailor you will most likely not be operating your own schooner. You will probably be working with a catboat, cutter, or sloop.
•Catboat: A Catboat has a mast set up near the front of the boat and is a single-sail boat. They are small (or large, for that matter) and easily operated by one or two people.
•Cutter: Cutters have one mast with two sails in the front and a mainsail on the back of the mast. These boats are meant for small crews or groups of people and can be handled relatively easily.
•Sloop: Sloops are the most common type of sailboat (when you think of a sailboat this is probably the one you picture in your mind.) It has a single mast and is rigged up with a jib in the front and a mainsail attached to back of the mast. They can range in size and are ideal for sailing upwind.
•Ketch: A Ketch has two masts, with the second mast called the mizzen mast. The mizzen is shorter than the main mast and is in front of the rudder.
•Yawl: Yawls are similar to ketches with the difference being that their mizzen masts are located behind the rudder. The reason for this placement is that the mizzen on yawls is for keeping balance, rather than for moving the boat forward.
•Schooner: Schooners are large sailboats with two or more masts. The mast in the back of the boat is either taller or equal in height to the mast at the front of the ship. Schooners have been used to commercially fish, transport goods and as warships.

Know common terms used on a sailboat. Aside from the terms used for the different parts of the boat, there are also certain terms that sailors commonly use while at sea (or heading out to sea.) A trick to remember that port is left and starboard is right is that starboard has two ‘Rs’ in it, which is the beginning letter of ‘right’. Starboard, green and right have more letters than port, red and left. You can also keep in mind that “port wine is red”. [2]
•Port: When you are facing the bow (the front of the boat) the side to your left is the port side.
•Starboard: Starboard is the right side of the boat when facing the bow.
•Windward: As the name might imply, windward is the direction the wind is blowing from.
•Leeward: This is also called ‘Lee’. This is the opposite direction to the way the wind is blowing.
•Tacking: Tacking is when you turn the bow of the boat through the wind so that the wind switches from one side of the boat to the other. This is when you most need to be mindful of the boom, as the boom will swing from one side of the boat to the other when you tack (you don’t want to be in its way when it does that.)
•Gybing (Jibing): This is the opposite of tacking, which means that it is when you turn the stern (or back) of the boat through the wind so that wind shifts to the other side of the boat. This is a more dangerous maneuver in a strong breeze than tacking because it you have to turn the boat away from the wind. Care must be exercised to control the boom during this maneuver as serious injury is a possibility when the boom travels across the cockpit.
•Luffing: This is when you steer the boat into the wind so that the sails begin to flap and lose drive.

Determine the wind direction. If your boat doesn’t have some kind of wind direction indicator (windex) at the top of the mast, tie a couple nine-inch pieces of old cassette tape, VHS tape, or oiled yarn to the shrouds—the rigging cables that hold up the mast. These will show you which way the wind is blowing. Some sailors find cassette tape to be just too sensitive for this purpose. If that’s the case with you, try using VHS tape or oiled yarn instead.
•Place them on each side, about four feet up from the sides of the boat.
•To sail effectively, you will need to know the apparent direction of the wind .
Point the boat into the wind. The idea is to have the minimum amount of wind resistance when raising the sail, with the sail straight back. In this position, the sail won’t be snagging on any shrouds or any other hardware, either. This isn’t always easy. The boat won’t turn readily because it’s not moving (under way). Do the best you can, but be prepared to work for it!
•If your boat has a motor, use the motor to keep the boat pointed into the wind while you hoist sail.
•Here’s a handy tip: if the water is not deep at your dock, or if you have no side pier, walk the boat out away from the dock and anchor it into the sand, and the boat will automatically point itself into the direction of the wind!

Attach the sails. Secure the bottom front (tack) of the mainsail and jib to their respective shackles on the boom and the bow of the boat.
•There will be a small line (outhaul) attaching the back of the mainsail (clew) to the boom and its cleat. Pull it hand-tight in the cleat. This tightens the foot of the sail.
•Hoist the mainsail by pulling down on its halyard all the way until it stops. It will be flapping around (luffing) like crazy, but thats ok for a short period of time. (Excessive luffing will drastically reduce the life and durability of the sail).
•The leading edge of the sail (luff) must be tight enough to remove folds, but not so tight as to create vertical creases in the sail.
•There will be a cleat in the vicinity of the halyard where it comes down from the top of the mast. Cleat the halyard. Using the jib halyard, raise the front sail (jib, genoa or simply the headsail), and cleat the halyard off. Both sails will be luffing freely now. Sails are always raised mainsail first, then the jib, because it’s easier to point the boat into the wind using the main.
Adjust your heading and sail trim for the wind. Sailboats cannot sail directly into the wind. As shown below, the red zone in the diagram indicates a “no go” zone when under sail. To sail to windward, a sailing vessel must sail about 45-50 degrees off the wind and change direction by tacking (or zig-zag). •Turn the boat to the left (port) or right (starboard) so it’s about 90 degrees off the wind. This is known as a beam reach.
•Pull on the main sheet (trimming) until the sail is around 45 degrees away from straight back (aft). This is a safe place for the main while you trim the jib.
•You will start moving and tilting (heeling) away from the wind. A heel of more than 20 degrees usually indicates that you’re being overpowered. Releasing the mainsheet momentarily (breaking the main) will lessen the amount of heel, and you will return to a more comfortable sailing angle of 10 to 15 degrees.
Trim the jib sheets. Although the mainsail is hoisted first, it is the jib that is trimmed first. There are two jib sheets, one for each side of the boat. Pull on the jib sheet on the the side away from where the wind is coming from (leeward side). This is the active sheet while the other is called the lazy sheet.
•The jib will form a curve or pocket; trim the sail until the front edge just stops luffing. Keep your hand on the tiller (or helm) and stay on course!
Trim the mainsail. Let out the main sheet until the front edge just starts to luff, then pull it back just until it stops.
•If you or the wind hasn’t changed direction, this is the most efficient place to set the sails. If anything changes, you have to adjust them in response.
•You have just entered the world of the sailor, and you will have to learn to do many things at once, or suffer the consequences.
Watch the front of the sail edge on the main and jib. If it starts to luff, you have two choices: tighten the sail sheet until it stops luffing, or steer away from the wind (bear off). When the sail luffs, it means that you are heading too much into the wind for your current sail setting. If you bear off slightly, (away from the wind) your sails will stop luffing.

Watch your wind indicators (telltales). If you see it change so that the wind is coming from a direction that is more behind you, you will be wasting energy. Let out the sail until it is perpendicular to the wind. You will be constantly; watching the sails, the telltales, and trimming sails because the wind won’t blow from a constant direction for long.
•When the wind is at your back and side (aft quarter), it’s called a broad reach. This is the most efficient point of sail as both sails are full of wind and pushing the boat at full force.
•When the wind is at your back, you are running with the wind. This is not as efficient as reaching, because the jib is covered by the mainsail and not filling with air.
•When running with the wind, you can pull the jib over to the other side of the boat where it will fill. This is called wing-on-wing, and you have to maintain a steady hand on the tiller to keep this sail configuration. Some boats have a “whisker pole” which attaches to the front of the mast and the clew of the jib which makes the jib much easier to control and keep full of wind. Be sure to be vigilant of obstacles and other vessels, as having both sails in front of you blocks a significant portion of your view.
•Be careful—when the boat is running, the sails will be way off to the side, and because the wind is basically behind you the boom can change sides suddenly (jibe or gybe), coming across the cockpit with quite a bit of force.
•If you have a wind direction indicator at the top of your mast, do not align the boat so that the wind indicator points at the mainsail. If it does, you are sailing with the boom on the windward side (sailing by the lee) and are at high risk of an accidental jibe. When this happens the boom can hit you with enough force to knock you unconscious and out of the boat (overboard).
•It’s a good practice to rig a preventer (a line from the boom to the toe rail or any available cleat) to limit the travel of the boom across the cockpit in case of an accidental gybe.

Posted in General | Leave a comment

The Mast Walk by Alex Thomson .

Mr. Thomson takes the walk and then the plunge. Yeah, it’s a little corny; the reality TV music makes us want Alex to maybe, just maybe catch his foot in a halyard. But as you can see, this was no photoshop job. Balls of steel or stupid stunt? You decide …..

click here Hugo Boss

Posted in General | Leave a comment

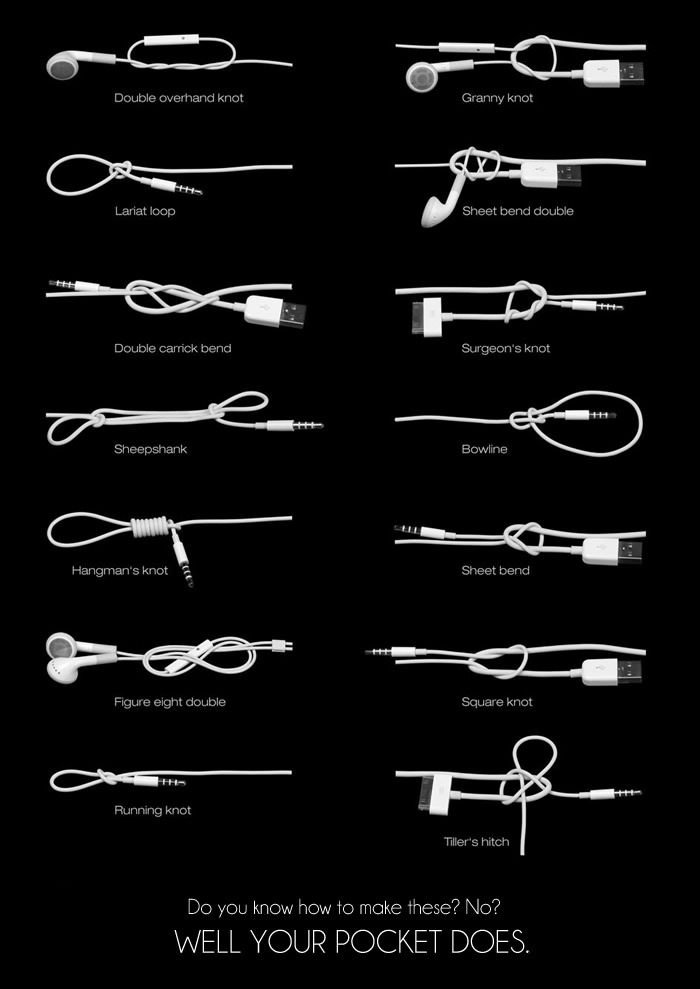
Modern knotting board

knotting-373997

Posted in General | Leave a comment

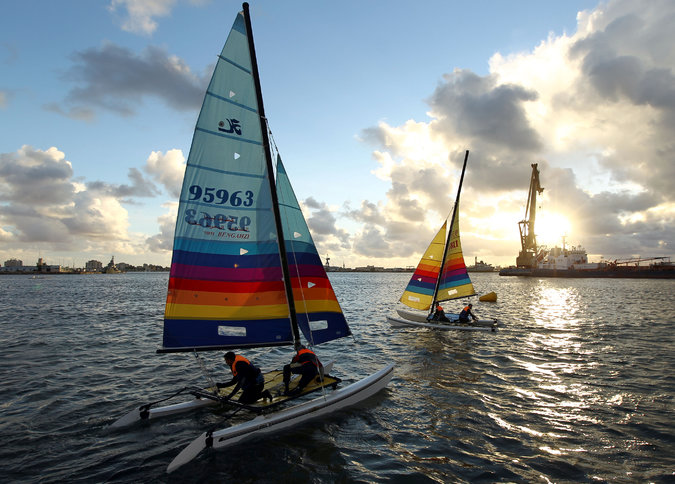
Hobie Alter, Innovator of Sailing and Surfing, Dies at 80

alterobit2-master675

Hobie Alter, who was known as the Henry Ford of the surfboard industry for his manufacturing innovations and who used his idle time to create the Hobie Cat, the lightweight, double-hulled sailboat that achieved worldwide popularity, died on Saturday at his home in Palm Desert, Calif. He was 80.
His death was announced on his company’s website.
By the time Mr. Alter, a surfer himself, developed the Hobie Cat in the 1960s, he had had great success in developing manufacturing techniques and using breakthrough materials in the production of surfboards. He worked out of a small factory along the Southern California coast, not far from where the famous Killer Dana wave roared.
Only minutes from the beach, Mr. Alter was a familiar figure there, surfboard in tow. But like other surfers, he was frustrated when strong offshore winds were blowing, flattening the majestic wave tubes they so cherish. So he decided to use the time to work on his idea for a downsize version of a catamaran: a small, twin-hulled sailing craft that would skim the waves, not unlike a surfboard. It would give surfers something to do when they could not ride their boards to full exhilaration.
Credit Douglas Kirkland/Corbis He could not have anticipated how popular his Hobie Cat would become.
“Leaping over a breaker in the Southern California surf, this lightweight catamaran looks more like a kite on takeoff than a boat,” Life magazine wrote in 1970, two years after the first Hobie Cat, a 14-foot model, went on the market. Longer versions followed.
Unlike conventional sailboats, which knife through the water, a Hobie Cat skitters across the surface, resting on two pontoons and drawing only a few inches of water. If a gust knocks it over, a sailor can easily right it by hauling lines attached to each hull.
“His catamaran was designed to help dedicated surfers find excitement on breezy days,” Life said, pointing out that 1,000 had been sold for $1,200 each in the first two years.
Since then, more than 200,000 have been sold worldwide, now at prices from $3,400 to more than $20,000. And the clientele has ranged far beyond the surfer crowd.
“It was so superfun to sail that it became the largest multihull class in the world, with its own lifestyle and culture,” Steve Pezman, the publisher of Surfer’s Journal, said in an interview in 2011. “Not only did they race the boats, thousands of people would go to the lake and party.”
Pete Melvin, a multihull designer and top America’s Cup catamaran designer, said in an interview on Monday that he sailed in Hobie Cat events in Florida as a teenager. “It was more of a cultural get-together with a different feel to the yacht club scene,” he said.
He added that it was “like going to a rock concert instead of a regatta.”
Mr. Alter’s influence is still apparent, Mr. Melvin said. “A lot of those early adopters who sailed the Hobie 14 and 16 helped push the sport forward,” he said. “Without that surge of interest, we wouldn’t be anywhere close to where we are today in terms of acceptance of multihulls.”
Hobart Laidlaw Alter was born in Ontario, Calif., on Oct. 31, 1933, one of three children of Hobart and Katie Alter. The family owned orange groves around Ontario and a summer home in Laguna Beach.
“That’s where he got into skin diving, spear fishing, riding waves on a big old paddle board,” his son Hobie said. “When he was 17, a guy showed up with a balsa board. They switched, and my dad knew this was what he needed to learn how to surf.”
That summer, in 1950, Mr. Alter fashioned his own balsa board in the garage at Laguna Beach and sold it. It was the start of a multimillion-dollar sports empire that his sons, Hobie and Jeff, still run.
In 1954, using $8,000 he had inherited, Mr. Alter, then 21, purchased a lot on Coast Highway in Dana Point, Calif. There, he built what evolved into a surfboard factory. Until then, most aficionados had fashioned their own boards in their basements or garages, mostly out of bulky redwood planks or lighter but far more porous balsa. Others went to surf shops, where boards made individually by artisans could be bought.
But at Hobie Surfboard, in large part because of its shoreline location, demand quickly exceeded expectations. Soon there were six-week waiting lists for Mr. Alter’s boards. To meet demand, he introduced a production line and hired workers known as shapers to manufacture as many as five a day.
“He became known inside the sport as the Henry Ford of surfboard manufacturing,” Mr. Pezman said.
Mr. Alter came up with another innovation in 1959, working with a master laminator, Gordon Clark, known as Grubby. Instead of using expensive balsa, he began making boards out of polyurethane foam, a durable synthetic material that cut costs and production time.
“While Alter was not the first to use the material,” The Los Angeles Times wrote in 1992, “he was the first to mass-produce the foam boards, paving the way for the surfing craze that was to follow in the 1960s and creating the prototype still in use today.”
Tens of thousands of Hobie boards have been sold, selling for about $1,000 each, Mr. Alter’s son Hobie said. The Hobie logo — with the right leg of the H swooping under the name — can be spotted on beaches around the world.
In 2011, Mr. Alter was one of the first 15 inductees into the National Sailing Hall of Fame in Annapolis, Md.
Besides his sons, Mr. Alter is survived by his wife, Susan; a daughter, Paula; two sisters, Carolyn Wise and Lillian Spencer; eight grandchildren; and a great-granddaughter.
After creating the Hobie Cat, Mr. Alter built a 60-foot, diesel-powered catamaran for his own cruising. Profitable though the business became, however, what drove him was the search for the next plaything. He also created the Hobie Hawk, a radio-controlled model plane; and the Float Cat, a small fishing platform that can be paddled or pedaled on the water.
“Throughout his life, he’s really been a toy designer,” Mr. Pezman said, “with himself in mind.”

Posted in General | Leave a comment

Indoor Boardsailing.

Clickety Click Indoor board sailing

Here is an idea to promote dabbies !!!

Posted in General | Leave a comment

Sailing Lessons in the snow – Doug Sailing Anarchy

Why do we practice capsizing? Aren’t we supposed to avoid that? Yeah well, if you -never- capsize you’re just not pushing hard enough, plus it is a good idea to learn how to keep control of the boat when it is not going according to plan.

Yesterday afternoon, our local high school junior ROTC had capsize practice at the YMCA pool. Last week it snowed like heck, and it’s snowing again now (wait I thought this was the South!) so we are officially grateful to get in some sailing related activities at all.

This sailing program is a little different from most others I have seen. The kids come from all walks of life, for most of them this is the first time they have been on a boat of any kind. They learn a lot, and they learn fast. We have a small group of “advanced sailors” who have been in the program for a few semesters, they rig the boat up and help demonstrate how it works.

This program is more about teamwork… the kids carried the FJ thru a narrow gate and into the pool building… and of course practicing leadership… than it is about pure sailing. The only ones of these kids that have any racing experience in this group are the ones that crew on keelboats in the local PHRF fleet; they also take a turn in the mark boat for local club races. But this program could not care less about starting techniques and roll tacking. The goal is for them to learn the basics, work together to apply the basics, and practice leadership directing their peers in this activity.

The young man holding the bow in this picture started sailing in this program as a freshman, this summer he’ll be off to college with more confidence that he can succeed in a new & strange environment… after all, it won’t be anywhere near as treacherous as going out on the water as a newby… and is hoping to get on that school’s sailing team. The young man holding the centerboard lived for much of his life so far in a refugee camp. He has excelled here. I don’t think he needs the sailing experience as much, but it’s good to see him having fun too.

Posted in General | Leave a comment

The start Line – http://www.cautionwater.com

When first getting into racing, you’d be forgiven for thinking it’s a case of get to the start line, race, finish – it’s nowhere near that simple, and the tactics and preparation start at the start line. But first, some basic terms.
Most start lines have a pin end, and a committee or starting boat end. The pin end is typically a buoy or fixed point on the water, and the committee boat end is a safety boat of some sort that is monitoring the race start – the race may be started from this boat, or from a point on land, depending on the venue – obviously if a race is happening just off the coast, then the officers running the race will do it from safety boats, whereas if it’s on a lake, they may do it from the warmth of a starters building or the clubhouse if it’s next to the water.
An alternative method employed by some clubs is to use a transit system – two objects are placed on the side of the water, and the boats involved have to make a transit between the two objects as shown in the picture below – this is a transit between two points, and indicates the start line. This is typically used at smaller clubs.

Transit System
Types of StartThere are two types of start – a line start, and a gate start. The line start is the most common, and this is the type that involves a pin end and committee boat end. These two ends are placed a certain distance apart (which depends on how many boats are taking part, the size of the venue etc), and when the whistle blows, or the flag signals change indicating the start of the race, all of the boats have to pass between these two ends of the line to start the race.
The second type of start, the gate start, is not as common. For this type of start, a powerboat travels along the length of the start line in front of the boats racing, and as the powerboat passes in front of you, you are allowed to start racing. Downsides to this include mostly the chance of hitting one of the starting boats, which can give you a penalty – plus you get disrupted water from the wake off the powerboat, which can be especially bad news on days without much wind as what little shape is in the sails can be knocked out by the waves you are sailing through.
Line starts can have their disadvantages too – for particularly large events with over a hundred boats taking part (several of the National Optimist races in the last few years have had over 300 entrants!), the start line can be especially long, and the conditions can vary along the length of the line, which makes your position even more tactical. We’ll see more on this in a moment, when we talk about line bias.
How is the race started?Races are usually started with a series of signals, either noise signals (a whistle or horn) at a set of intervals, or a series of flags are raised and lowered at set intervals, typically 5 minutes, then 4 minutes, then 1 minute, then race start. We’ll look more at starting signals in the next article of this series.
Line Bias So it doesn’t matter which end of the line you start on, right? Wrong!
Depending on how the course is laid out, if you start on the left hand side of the line as in the diagram below, you are already closer to the first windward mark, and can sail a shorter distance than if you start on the right hand side of the start line. This should factor heavily into your tactics for deciding where to start on the start line. The race start line is rarely at a true right angle to the first mark – that is the windward mark is directly upwind of the start line as shown, and usually you will find one end is closer to the mark than the other – and the longer the start line is, the greater this advantage can be. This is known as line bias.

Start Line Bias
However, consider this – if you start on the port end of a biased start line, and say you are two boat lengths closer to the mark, if the wind is stronger and more favourable on the other end of the start line, people starting the other end will be sailing into stronger wind, with more speed. Therefore, is is better to start at the end of the line nearest the wind (i.e. if the wind is coming from the left side, start at the port end of the line).
A good race officer will “bias” the start line by a small amount, say 5 degrees, that is, they will shift one end of the start line upwind slightly, and make the start line angled in relation to the first mark, rather than at right angles to it, as shown. This introduces slightly more in the way of tactical thinking required while you’re battling for position on the start line.
Preferred side of the courseBut, it’s not just about where you start! There is usually a preferred side of the course. One of the most important things to do during pre-race preparation is to get out on the race course and sail it a few times before the race starts – this way you can figure out which side of the course is the better side to sail on.
In the diagram below, the purple boat has picked the side of the course which has a shorter route to the buoy – however, there is less wind on this side of the course. The red boat meanwhile has picked the other side of the course, which while slightly further to the first mark (buoy), has considerably more wind than the other side of the course – therefore the red boat gets to the first mark first.
Why would one side of the course be better than the other? There are various reasons why one side of the course may be better to sail on – it may have stronger wind or more gusts, it may have less currents or tide, or more room to manoevre meaning fewer tacks. Smaller lakes can often be surrounded by trees that can make wind patterns very shifty and hard to identify or monitor, leading to wildly varying wind conditions over the lake (on our lake, in one 10 x 10 metre spot in the middle the wind often does a complete 180 turnaround).
Features of the land can also cause differences in wind, particularly around headlands – we’ll cover more on this in a later article. They don’t have to be obvious either – when we were sailing in Greece, we were in a semi-sheltered bay, with a pretty consistent wind over the entire bay, yet even sailing in Lasers in a steady Force 2 morning breeze every race there was a faster side of the course to sail on – not alway faster by much, but you could definitely tell. All of these can mean one side of the course is better to sail on than the other.
Unfortunately, the only way to determine which side is the best side (apart from visually identifying key features such as headlands, or looking up maps that show tides and currents) is to get out on the course first thing, and find out for yourself.
But why is this important for start line tactics? We’re talking about the rest of the race, aren’t we? Yes, but the side of the course you want to sail on helps decide which end of the start line you wish to sail on. If you are going to come off the start line on port tack, then immediately tack onto starboard, you may be best starting at the port end of the start line, otherwise you may have lots of boats heading straight at you – you may well have right of way, but there are going to be a lot of angry sailors on those boats, some with bowsprits they can poke you with!
Starting PenaltiesOnce the whistle or flags go – you’re off… that is, unless you did something wrong. If you were over the start line at the start of the race, this is known as OCS (On Course Side at start), and depending on the race rules, you can either be recalled back, in which case you have to sail back behind the start line, and cross it again (i.e. restart) – if you don’t you will be disqualified even if you completed the race, or you can be disqualified straight away. Generally speaking, you are recalled to recross the start line. Sometimes if too many boats are over the start line before the race starts, the entire race start will be called off, and all the boats will start the countdown to the start again.
SummaryBelieve it or not, this is again only an introduction to starting tactics – there are all kinds of detailed rules telling you how you can find a spot on the start line, who you’re allowed to force out of the way and so on, but for now, if you’ve read through what’s written above, you’ll be better off than a lot of smaller club sailors

Posted in General | Leave a comment